Bulgarian accordion can be played standing or sitting, and should be practiced both ways. In either case, the instrument should be mounted solidly on your body so that is not constantly shifting beneath your hands. While standing, take care not to counter balance the weight of the instrument by swaying your back. This will hurt your back over time. Instead, stand solidly with feet spread about the distance of your shoulders, with slightly bent knees. Angle your shoulders slightly forward of your hips, using your hips (not your back) to counterbalance the instrument's weight. While sitting, the keyboard will dip somewhat between your legs. Extend your right knee outward to allow access to the upper keyboard.
Optimal hand attitude to the keyboard is achived though a combination of shoulder, elbow and wrist angles. The right shoulder should be relaxed and mobile. The right elbow is slightly raised from its natural position, drawing the shoulder slightly away from the body and angling the forearm back toward the keyboard. The elbow angle varies as the hand moves between the upper and lower keyboard. When on the lower keyboard, it is important that the elbow angle not become too acute, creating tension in the muscles of the upper and lower arm, and impairing finger mechanics.
The join of the forearm and wrist should be relaxed and mobile. From this join, the wrist can move in two planes: up-and-down and left-to-right. The up-and-down angle is slightly downward from straight which allows the fingers to attack the keys at an appropriate angle (see hand position below). This up-and-down angle is fairly constant during a performance. Too great an angle here will cramp the wrist and impair finger motion. The left-to-right wrist angle changes often during a performance to accomodate playing mechanics to the black and white key geometry of the keyboard.
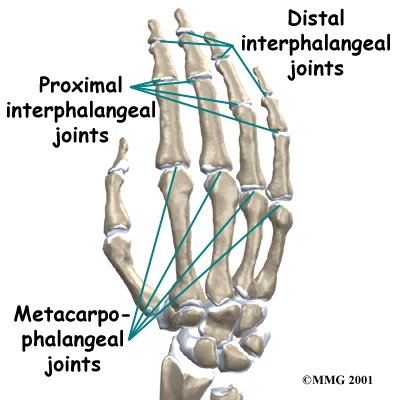
In neutral position, a relaxed hand should be held at an elevation over the keyboard so the tips of the fingers and thumb barely touch it. For each finger 2-5, the first (proximal) phalanx should be approximately in same the plane as the palm, with the second and third phalanges dangling below. These fingers are bent primarily at the 2nd knuckle (the proximal interphalangeal joint) so that the second and third phalanges are not quite perpendicular to the palm. The thumb is held below the hand at an angle of approximately 20 degrees.
The melody-intensive, monophonic character of Bulgarian melody drives the technical demands for key depression. To a first approximation, keys are depressed either as melody notes (16ths) or as ornaments. The mechanism for melody note key depression is described here. Ornamental mechanics are described later in the tutorial.
In resting position, fingers 2, 3 & 4 are curved as if holding a tangerine. Keys are depressed with these fingers by bending primarily at the 2nd knuckle, brushing the finger inward toward the palm. Bending too much at the 1st knuckle results in the finger resting so deeply in the keyboard as to make subsequent actions awkward. Bending from the 2nd knuckle facilitates more compact motion (and thus, greater speed) and imparts a somewhat crab-like affect while traversing a melody.
Keys are depressed with the thumb by rotating the wrist (and thus tilting the plane of the hand) to the left. Depression may be assisted by moving the thumb horizontally away from the palm from the 1st knuckle. As the hand tilts, this horizontal displacement become somewhat vertical, moving the thumb into the key.
Finger 5 - being significantly shorter than 2, 3 or 4 - can't use the same brush mechanics as above. However, most basic Bulgarian melodies can be played fine without finger 5, so I will postpone its discussion until later in the tutorial.
The descriptions above probably seem unnecessarily complicated and specific at this point. The reason they are as they are is the complementary motions of thumb and finger 2-4 depression integrate in a specific way to facilitate the Tilt-Brush-Pivot methodology of the next lesson. That methodology constitues the foundation of my approach to Bulgarian accordion playing.
NOTE: It will be difficult (if not impossible) to execute the techniques for fingers 2-4 described in this tutorial unless your fingernails are clipped quite short (less than 1/16 inch). As the finger is drawn under the hand, you will be forced onto the nail, thus losing the required sensitivity of touch. Longer nails for the thumb and finger 5 are somewhat less problematic.
In classical piano technique, the thumb often crosses under other fingers in upward passages and fingers 2-4 often cross over the the thumb in downward passages. There are several ways to do this and the way I was taught in classical piano does not well serve Bulgarian melodies on the accordion. Bulgarian ornamental fingering (described later) requires that the bulk of the melody will be played with fingers 1, 2 & 3. Thus crossing over or under with finger 4 is rarely required - most crosses use fingers 2 or 3, with 2 being more common.
In rising passages, the thumb does not actually cross under the palm. Rather, with finger 2 or 3 depressed, the wrist angles to the right of the palm so the thumb can reach its target key without having to move under the palm. This allows the thumb to depress the key with the standard tilting motion described above. If the wrist doesn't so move to accomodate, the thumb would need to make an awkward (and slow) backward motion to depress the target key.
When crossing finger 2 or 3 over the thumb in a downward passage, it is important to NOT rotate your forearm (counterclockwise) to allow the finger to reach its target key (as classical technique suggests). Instead, curl finger 2 or 3 more than usual and close the hand to the thumb allowing the finger to reach. This motion can be slightly assisted by angling the wrist leftward, but most of the work is done by finger curling and hand closing. And again, don't rotate your forearm! Pay attention to the bones on the right side of your wrist (the ulnar styloid process and the pisiform bone). They will elevate if you rotate your forearm left, but they should remain largely stationary in Bulgarian technique.
Each lesson in this tutorial will be accompanied by a practice page. The practice page for lesson 1 supports practice of key-depression fingers 1-4 and crossovers with fingers 2 & 3.
LINKCopyright 2018 Erik Butterworth. All rights reserved.